 Isolate Member by Piecemark ( Modeling )
Tool summary :
Also see :
- Modeling (where Isolate Member by Piecemark is a tool)
- Member isolation (result of using this tool)
- Default hide item settings (affect selection list)
- Member isolation solid display type ( User and Site Options > Modeling > )
- OK (to exit member isolation)
- Isolate Member by Location (alternative)
- Isolate Member by Number (alternative)
- Status Display (select ' Masked ' and ' None ' for isolating)
- Find Material (isolates members in other way)
page 1 | contents | model > member > isolate > | member isolation
Step-by-step instructions :
Isolate Member by Piecemark can be used to bring a member into member isolation mode . This includes group members. You select the member by its piecemark on a selection dialog. The following instructions assume that you are in Modeling and that the 3D model has members in it which have been assigned piecemarks. The assigning of piecemarks takes place during Create Solids .
1 . Invoke Isolate Member by Piecemark using any one (1) of the following methods:
Methods 1, 2 & 3 : An Isolate Member by Piecemark icon can be added to your toolbar (classic) or ribbon (lightning). The icon, keyboard shortcut or context menu command can be found in the group named ' Model -- Member '. For lightning, Customize Interface is used to configure ribbons, keyboards, the context menu and modes.
Method 4 : If " Modeling layout style " is ' Classic ', you can use the menu system to choose Model > Member > Isolate > Isolate Member by Piecemark .
Method 5 : In Isolate Member Mode , right-click ( By Pcmk ).
2 . A selection dialog opens. On it is a selection list of all piecemarks that have been assigned to members or group members .
|
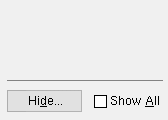
Optional : Use " Hide ... " and " Show All " to adjust the classes of members that are shown on the selection list. |
Alternative 1 : Double-click the listing of the member you want to isolate. Go to step 3 (if it applies), or step 4 (if it applies) or step 5 (if the selected piecemark has been assigned to only one member that can be seen in your current view).
Alternative 2 : Press the " Cancel " button to end the Isolate Member operation and stay in your current view of the 3D model. Do not continue.
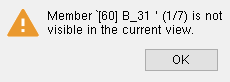
3 . Skip this step if you do not get an alert box like that shown below. There are three possible reasons for this alert.
|
(1/7) means [60] is 1 of 7 members with the piecemark B_31. |
Possibility 1 : If the member with the lowest member number [num] that has the selected piecemark is not visible in your current view, you get this message even if other members with that piecemark are visible in your current view. Press " OK " to continue to step 4.
Possibility 2 : If only one member has been assigned the piecemark you selected in step 2, and that member is not visible in your current view, then when you press " OK " the member will be isolated. Go to step 5.
Possibility 3 : This message may also appear in step 4 if middle-click ( Next ) results in the selection of a member not visible in the current view.
4 . If more than one member has been assigned the selected piecemark, then Accept - Next - Return mouse bindings become active. The status line shows the currently selected member's piecemark and member number.
|
|
|
bindings |
4a (optional) : Middle-click ( Next ) to select the member that has the next highest member number with the same piecemark. After the member with the highest member, Isolate Member by Piecemark selects the member with the lowest member number. The message that appeared in step 3 (see possibility 3) appears for each selected member that is not shown in your view.
Alternative 1 : Left-click ( Accept ) to isolate the selected member. Go to step 5.
Alternative 2 : Right-click ( Return ) to cancel this operation and keep everything as it was before step 1. Do not continue.
5 . The member isolation program opens preset view number 0 for the particular member with the lowest member number that has the piecemark you selected. Preset view number 0 is its " MAIN VIEW ." The member is displayed per User and Site Options > Modeling > " Member isolation solid display type ."
Tip: To exit member isolation, press the " OK " button on the Isolate Member toolbox.
page 1 | contents | model > member > isolate > | member isolation | top